Showing posts with label How-To's. Show all posts

ADDING VALUE TO YOUR HOME

If you’re about to place your home on the market and wondering just what you can do to maximize your asking price, pay attention. There are a number of home improvements you can make that pay significant dividends. Some require a small investment, others a little more. But all are sure to increase the overall value of your home and help you get the most bang for your buck. Take a look at the info-graphic below for some ideas on what you can do to ensure you laugh all the way to the bank on auction day.

Adding Value to Your Home - Infographic by Renovation Kingdom

Adding Value to Your Home

Clean up
Getting rid of everything you don’t need or use anymore, and freeing up the space in your home in the process, can increase the value of your home by as much as 7 percent. Nothing pushes potential buyers away from your home more than clutter – your clutter. It makes it hard for them to imagine being in the house themselves, and makes your home look smaller.

Clearing the clutter creates a more open space, and allows you and potential home buyers to make better use of it. How about installing a small at-home gym in that garage of yours, now that you actually have the space for it? Or how about making better use of that loft space of yours? Experts suggest that converting a loft into an extra room can add up to 20 percent of value onto your home. Clearing up the clutter isn’t just confined to indoors. How about clearing the junk in your backyard and creating a nice patio space for entertaining your friends and family on those sultry summer evenings? If there’s one investment you can make to your home that’s sure to add tons of value to your home, it’s transforming your yard into a landscaped paradise. You’d be hard pressed to find a single investor who doubts this, although they may disagree on exactly how much extra value it can bring (estimates range from between 5 to 20 percent).

Kitchen and Bathroom
Your home’s kitchen and bathroom(s) are two of the most used rooms in your home, and so giving them a new lease on life – either by changing your appliances/fittings, remodeling them, or changing the flooring – can increase the value of your home from between 3 and 7 percent. In fact, real estate experts agree that it’s the kitchen that ultimately sells the home. So make sure it’s in good shape before selling if you want to see your home go for as much as possible.

There are also a number of things you can do to the outside of your home to increase it’s curb appeal and ultimately it’s value. Take your entry doors. Your front door is one of the most important components of your home, and often the first thing potential buyers notice. Replacing your front door with a modestly priced steel door, for example, can add around 5 percent to your asking price. The same goes for your garage door. Automatic wooden or aluminum garage doors can increase the value of your home by as much as 5 percent and help it sell faster.

Roofing
Lastly, although perhaps only visible through Google Maps, replacing the roofing of your home and perhaps even adding some solar panels is sure to pay considerable dividends – often by as much as 1 to 6 percent, according to the experts.

Investing wisely in your home prior to putting it up on the market will generate the extra income you need to take that next important step in life. So take the time and spend the effort in putting some of these recommendations into practice, and charge the asking price you deserve.

*This post was contributed by Bob Gorman at Renovation Kingdom
Read Article »

Halloween Decorations - Grim Grinning Ghosts - Part 1


This year I am doing it big for Halloween. And when I say doing it big, I mean spending everything I had set aside for decorations on this...


Ever since I saw this a few years ago I've wanted to give it a try. I began by downloading a video from YouTube with just the singing heads. After that, I opened it up in After Effects and played around with the head positions, color, contrast, sharpness and length.

Next I began building the heads.


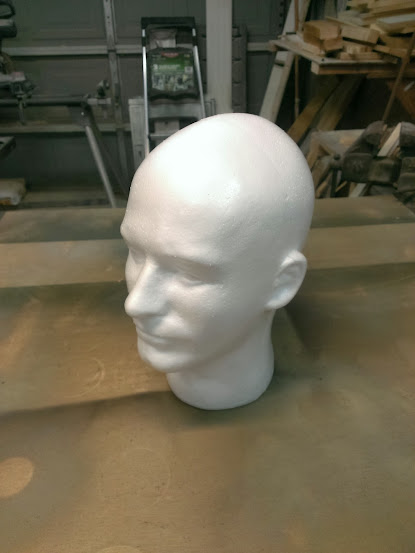
I purchased four of these foam heads from Hobby Lobby. I then built mounts for each head.


Once the heads were on, I fashioned the bust out of cardboard and hot glued it to the head and base.


I then used plaster cloth to add form and strength to the chest and shoulders.


As they were drying, the projector arrived in the mail via FedEx. I purchased mine off of eBay. I hooked it up to the computer and set up the heads for a quick run at the effect.

grim grinning ghost how to


And here is the video of my first attempt.


I think it looks pretty good so far. It's turning out well. Next up, I'll be building the stands for the heads and projector. Stay Tuned!
Read Article »

Squaring up board edges with a router


If you want to glue the edges of boards together to make larger panels, you need the edges to be square. This is easy if you have a jointer, but you can get the same results with a woodworking router. Steve Ramsey shows you how.


Read Article »

Our Kitchen Remodel (a story in pictures)

kitchen remodel before after

Hello everyone. So, we have finished our Kitchen remodel and I wanted to share the transformation with you. We've actually been finished for a few weeks now (sans the cabinet and drawer pulls) but I have finally gotten around to posting these pictures.

This post isn't really a how-to, but more of a progress collage of pictures. Hopefully it will give you some inspiration. If you have any questions of what we did or how we did it please ask.

We purchased our house a little under a year ago and knew that remodeling this kitchen was going to be the first big project we would tackle. Here she is in all her pre-remodel glory...

Read Article »

Getting Started with Gardening Using Raised Beds


by Kristian Hansen, Garden Expert at the Urban Garden Workshop
Starting your very first garden can be a daunting task. This is a guide to help make your entry into gardening fun and easy, and to give you some guidelines to help foster your relationship with your backyard. By the end of this article, you should be able to answer the following questions:

• Where do I begin?
• What kind of plants should I grow?
• How should I build, construct, and prepare my garden?

Now, let’s get started!

Planning Your Garden: Site Selection & Size

The first step to a successful garden is figuring out where you are going to place it. The space that you choose will help determine the types of plants that will grow best. Spend a day figuring out where in your backyard you get maximum sunlight. Your vegetables require 6-8 hours of natural sun per day to mature quickly.

You will might also want to determine the pH level of your soil. What kind of dirt do you have available? You might have to add nutrients to the soil, compost, etc. to make it great for growing your plants.

If you’re just starting out with gardening it might be easiest to build a raised bed. These come in a variety of sizes to fit inside of your backyard. Best of all, you can always add more later or take them apart and relocate them somewhere else later on. I also like first-time gardeners to try out raised beds because you can control most of the variables, like the soil content and watering schedule best. Since California is in a draught, we need to be mindful for water and how we can use it best.


Raised Beds: Save Water & Easy to Build

A raised bed is a great way to get started once you’ve decided on the location of your garden.

Redwood or Cedar makes for great wood. Make sure it is not treated lumber (I do not recommend pressure-treated wood due to the chemicals that can leach into your food). I recommend using 2" x 6" lumber. You can cut it down to the appropriate heights and use 4" x 4" wood in the corners and secure it with carriage bolts.

Furthermore, you can make the raised bed multi-tiered to raise the overall height of your garden (12" or two tiers is great for carrots).

If you have issues with rodents (like gophers), you may want to use hardware cloth underneath your raised bed.

Irrigation & Water

If you’re growing vegetables, you’ll want to provide about an inch of water per week. I tend to water my plants in the morning or at night.

Depending on how warm your area is you may only need to water your plants once a day or every other day. You can purchase a water timer from most nurseries for $20-50 and a simple irrigation kit of drips and tubing for another $30-50.

Vegetables & Fruits

The types of vegetables and fruits that you grow depends on the amount of sunlight and temperature you can provide for your plants. You can buy seeds online or find them at your local nursery. When I shop for seeds, I try and buy heirloom non-GMO varieties.

If you’re a little late in planning your garden, it might be time to buy starter plants. You can buy plants that are a few inches tall already and will jump-start your garden by about a month.

Depending on how big you decided to make your garden, you should set aside some space for the following:

Herbs & Spices: Thyme, Rosemary, Dill, Lavender, Basil, Mint;
Vegetables: Cucumbers, Tomatoes, Kale, Lettuce, Spinach, Potatoes; and
Fruits: Strawberries, Grapes, Blueberries.

Summary

Starting your garden should be fun for your whole family. With a few hours of work you can start to see results. Within a week of planting your seeds, you’ll see sprouts and your garden becoming a reality.

As you take care and nurture your plants, you’ll see your plants grow, leaves spread and fruit and vegetables bloom, and you’ll be happy growing your own food and making your backyard a more beautiful, living and useful space.

Read Article »

Extremely Heavy Duty Work Bench

I saw this great idea for a work bench online and wanted to share with you guys. It is very thorough and informative. 


Intro:

I have an area in the old barn that is unused and I wanted to convert to a 'rough' working place. The floor is unlevelled , which require adjustable feet to adjust for the height difference up to 30 mm. The angle of the wall corners are not perpendicular, they are more like 86 to 93 degrees, which require a remissive design.

Read Article »

Elevated Dog Bowl from Crate

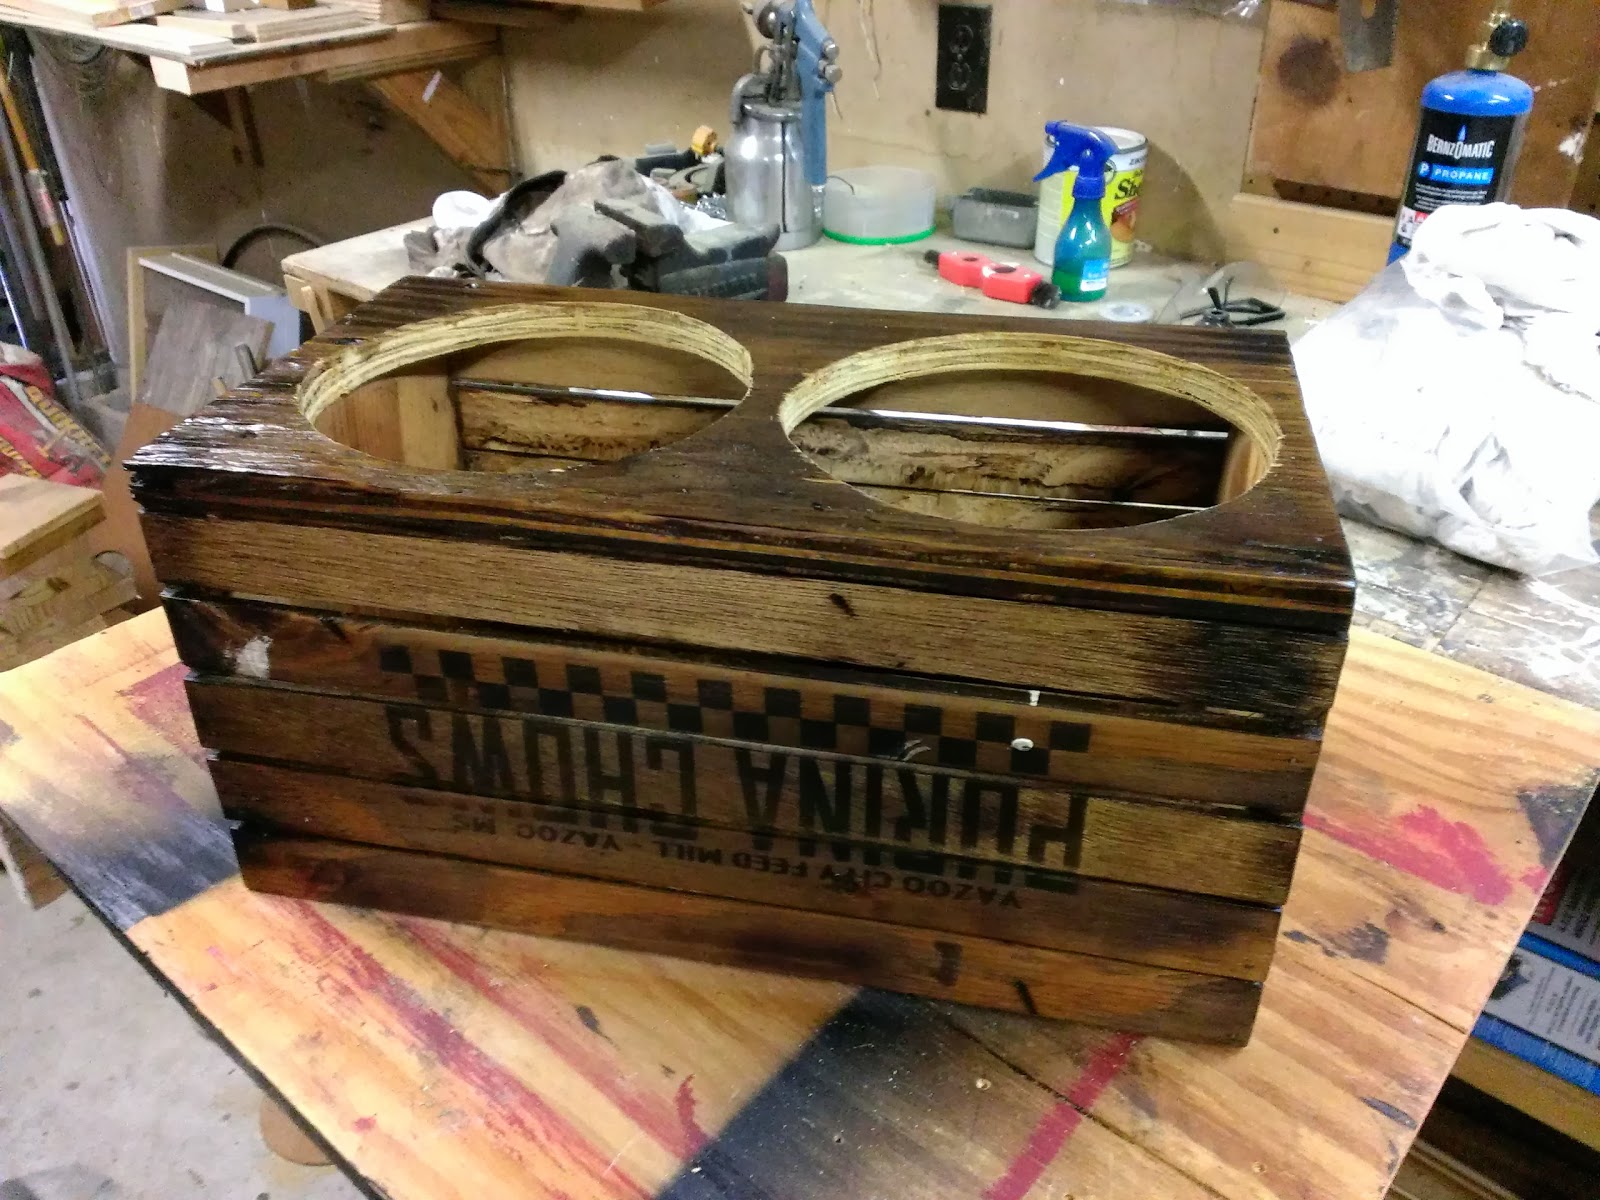
Spent a lazy Sunday in the shop today and threw together a project to make our dog's life a little easier. When larger dogs age I've heard that it's harder on them to bend down to get food and water out of their bowls on the floor. Is it true? Who knows, but I figured I'd at least give him a little assistance and allow me to stay busy in the shop, so here it is, an elevated dog bowl.

elevated dog bowl

I began by building a crate out of spare wood that was laying around. View the video below on building your own crate. I pretty much followed those same steps and altered a little for my needs like adding a stencil on the side to give it that old crate look and adding hand holes on the sides.


I purchased two plastic bowls from the dollar store and cut holes in the base to hold them. I hope you like it, the dog sure does.


Mr. Leon approves!
Read Article »

Claymation in Cinema 4D


Learn how to create a stop-motion / claymation look in Cinema 4D. This tutorial covers texturing and animating, and includes a bunch of tips and strategies to achieve this look.


Read Article »

This Graphic Shows You Quick Home Improvement Projects You Can Tackle


Sure, some home repairs increase your value and others don't, but we're all busy people, and not all of us have time for a massive kitchen remodel. This infographic will walk you through some of the ways to improve your home—and its value—in your spare time.

Most of the improvements are easy enough for anyone can do, even if you don't consider yourself much of a DIY-er. For example, the graphic suggests picking up an auto-mower if you have the right kind of yard for one, or adding a few window boxes with some flowers or herbs in them to brighten up the facade of your home. They also suggest adding dimmer switches to major rooms where a little soft light can improve the mood.

The guide also has some more questionable suggestions (mirrors "create energy?" and desks shouldn't face walls?) so take them with a grain of salt and apply the ones that make sense for your space and style. Even some of the questionable ones (mirrors can make a small space feel larger and brighten it up) can have some practical application. Check out the full image below, or hit the link below to see the graphic at QuickQuid.


Read Article »

Survive the Apocalypse with These Common Kitchen Items


When the lights go out or there's a natural disaster and you need to fend for yourself, proper preparation is key. Even better is knowing how to make use of the common items you may find in your home, or wherever you go. Channel your inner Macgyver and pick up a few tips from this graphic.

This guide shows you how to make a few things we've discussed before, most notably the Crisco candle and the milk jug lamp. However, the guide also has instructions on how to make a quick stove using common fertilizer, a simple water purifier, and even a toilet paper/coffee can heater in case of emergency. Hit the link below to see it at its source, or click expand on the image below to get a better view.

Do It Yourself Disaster Survival | Equip Supply via MakeUseOf

Read Article »

Dowel Hole Drilling Jig

This is jig to make holes for dowel without measuring. More precise you make this jig it will work better, so take your time. you can make it from laminated parts also and laser cut it for best results.

Step 1: Main parts

This are main parts. I used two 40mm X 250mm pieces of scrap.

Step 2: Making Slide

For slide I used scrap 4mm plywood.

Step 3: Using your jig

  1. Pinch side of material with jig.
  2. Drill hole
  3. Put dowel in hole.
  4. Turn Jig upside down and put other side of dowel in drilling hole on your jig.
  5. Set slide to touch edge of material.
  6. Align tables and leave space for jig.
  7. Put jig channel over dowel.
  8. Push tool so slide will align to material edge.
  9. Drill your hole.
  10. Repeat for all holes.
Tips
You can drill all holes on one side at one time, makes it easier and quicker.
Use depth gage so you will not drill through material.
This is how to use Woodcraft DowelMaster, idea is similar

Step 4: Variation

This I made for friend and it is with 6mm, 8mm, 10mm holes.
Read Article »

Watch Out for that Snowbank! How to Recover from 5 Types of Skids

Wanted to share this article with all my friends living in the north that are dealing with all that cold weather right now.

With winter comes a whole new range of driving hazards — darkness sets in much earlier, wind and snow reduce visibility, and ice makes roads slippery and treacherous. Annually, there are over 100,000 injuries that occur from car accidents on snowy or icy pavement. If you live in an area where snow is a winter reality (roughly 70% of the U.S. population lives in areas that average at least 5 inches of annual snow), then it’s vital to have the skills necessary for driving safely in inclement conditions. One of those skills is how to recover from a skid. The feeling of losing control of one’s vehicle can be quite scary, and it’s easy to panic and make the wrong moves if you don’t know what to do.
Below we outline the 5 most common types of skids on wintery pavement, and how to recover when they happen. In general, if you stay calm, restrain yourself from making drastic movements, and follow the tips below, you’ll be able to safely travel the nation’s highways and byways throughout the winter months.

1. Wheelspin

Wheelspin occurs when you try to accelerate too abruptly or enthusiastically for the available traction. The tires will start to spin at a faster rate than the vehicle is actually traveling, which can lead to different outcomes depending on whether the vehicle is front, all, or rear-wheel drive. The cure for wheelspin is simple: just back off the throttle until the tires regain traction, and try ramping it up more slowly and cautiously next time. This makes wheelspin a very easy litmus test for how much grip you actually have. For example, intentionally hitting the gas while leaving your driveway on a snowy day to see how easily the tires spin is like dipping your toes into a pool to test the temperature.
Wheelspin is generally to be avoided in turns, but can often actually work to your advantage when moving in a straight line. On pavement or glare ice, there is no real benefit to spinning the tires, but we need to think of the road surface as three dimensional in many cases. Say you have a few inches of snow on top of a good paved or gravel surface; spinning the tires will chew through the fluff and catch good traction on the underlying surface, which can often make the difference between getting up a snowy hill or sliding back down. The same is true in mud or anywhere else there is a slippery material on top of a hard, grippy material.
Traction control in some vehicles will not allow your tires to spin in this fashion. It will either cut the throttle, apply brakes to the spinning wheels, or both. This might mean that your vehicle can’t make it up slippery hills or even get out of your parking space if there’s snow. Try the same thing with the traction control off and you might find that you have no problem at all.

2. Wheel Lockup

Wheel lockup occurs when you try to brake too aggressively or suddenly for the surface you’re on. The tires will essentially stop turning while the vehicle is still moving. The solution is thankfully very simple: release the brakes until the tires start to turn again. You may need to release the brakes completely, and try braking again more softly and progressively.
You may find that you can actually brake fairly hard on a slippery road, as long as you do it smoothly. If you suddenly go from 0% to 50% brake on the snow, for example, the tires will probably lock up. If you build up the brake pressure slowly and progressively, however, you might be able to brake well beyond 50% on the same surface. Just like with wheelspin, wheel lockup can be a very handy gauge to have in changing conditions. Occasionally test the brakes in a straight line as you’re driving on a slippery road to feel for wheel lockup; this is a good indication of how much grip you’re working with.
Wheel lockup can also be an advantage in a straight line, in the same conditions that spinning the tires would have benefit. On a loose surface, locking the tires will scuff away the top surface, often digging in and plowing the soft stuff out of the way to find better grip. On snow, gravel, and especially sand, locking the tires up can stop the vehicle very quickly.
Anti-Lock Brake Systems (ABS) will not allow your wheels to lock up; they’ll pulsate brake pressure at all four wheels so that the tires keep turning.  This means that on a loose surface, your car may not decelerate very well, and you’ll need to leave extra braking and following distances to compensate.

3. Understeer

An understeer skid occurs when the front tires lose grip, and the car is unable to turn around a corner. It’s often referred to as “plowing” or “pushing,” and it most often occurs when you enter a corner with too much speed for the conditions. If you’re doing 70 mph in a 30 mph corner, unfortunately it’s all over…look for something soft to hit and work on reading the road and the conditions better next time. If you’re only slightly too hot coming into a corner, the solution is to let off of the gas and apply the brakes gently, while looking where you want the car to go at all times.
Spinning the front tires can also cause massive understeer. In a front-wheel drive car, don’t spin the tires if you want to have any chance of turning. Locking the front tires in a corner will also cause horrible understeer; if you’re braking aggressively in any vehicle and trying to turn at the same time, you’ll need to release the brakes somewhat in order for the car to steer.
Understeer also happens because of weight transfer. If you’re accelerating, especially up a hill or in a vehicle with soft suspension, there won’t be much weight on the front end and you’ll have to lift off the gas or apply the brake a little to get the nose down. Weight on the front tires will push them down onto (or into) the surface, often giving you much better grip.
Resist the temptation to give the car more actual steering when you enter an understeer skid. It’s the natural thing to do — “The car won’t turn, so I’ll turn more!” — but the problem needs to be fixed with the pedals and not with your hands. You’re either accelerating or braking too much or not enough; adding more steering will only compound the problem and waste valuable time. You have the most grip with slight steering inputs — if your front tires are turned at high angles there’s very little chance they’ll do what you want.

4. Oversteer

An oversteer skid occurs when the rear tires lose grip, and the rear of the vehicle starts to slide sideways. This most often occurs because of wheelspin in rear-wheel drive (and some all-wheel drive) vehicles, and the solution in that case is simply to back off the throttle, look where you want to go, and slightly steer in that direction.
Oversteer also occurs fairly often when you’re going too fast for the conditions, and apply brakes while turning a corner. This will shift much of the vehicle’s weight onto the front tires and off of the rear. The rear will start to come around simply because there is no weight on those tires, especially in pick-up trucks, front-wheel drive cars, or other vehicles that are naturally light in the back. This also happens going downhill around corners for the same reason. Again, the solution is to look down the road where you want to go, release the brakes, and even accelerate a little to put some weight back onto the rear tires to stop them from sliding.

5. Counterskid

The counterskid occurs when you have met with oversteer and failed to correct appropriately. The rear end of the vehicle will skid back and forth, often building momentum with each swing. If you don’t fix the first or second skid, you’ll often generate enough energy to make the third skid very violent and difficult to recover from.
When you encounter oversteer, the key is to look down the road and only use enough corrective steering to point the front tires where you want to go. As the vehicle straightens out, straighten the wheel so that the tires are always pointed down the road. Counterskids most often happen when drivers correct late, overcorrect, and then repeat this mistake until they’re off the road. Known as “fishtailing” or “tankslapping,” counterskids can be difficult to recover from, but your vision is the key. Regain control of the steering, don’t let the car bounce back and forth, and you’ll be fine.
__________________
Wyatt Knox is a former US Rally Champion in the Two Wheel Drive Class. He is also the Director of Special Projects at Team O’Neil Rally School, instructs at several performance driving schools in the US, and currently races in both North and South America. 
Illustrations by Ted Slampyak
Read Article »

Take the carpet off those stairs!

Hey guys. Wanted to share my latest project with you. There are countless articles and how-to's on the web of folks who have taken the carpet off of their stair cases to reveal hardwood. This is what I went through to do mine.


Out staircase was covered in that ugly beige carpet, and over time had gotten soiled and stained from all the traffic up and down. I decided it was high time to do something about it.


Nasty right? The first step... remove the carpet. Now, others who have done this were blessed with almost perfect wood stairs underneath.  A little sanding and painting and they're done. Was I going to be so lucky?


No. There were huge gaps between the steps and risers and between the stair case and walls. I didn't want to surround the whole thing in molding to cover all the gaps so I needed to replace all of the wood. I replaced the steps with 2"x12' lumber and the risers with 2"x8' lumber. It worked out to about $75 at the hardware store. And I didn't have to worry with removing all the nails and staples that held down the carpet. Lucky me!

Some install and light sanding was all she needed.


Now came the fun part, staining. We used Dark Walnut to try and match our floors. My wife was nice enough to tackle this project while I was at work. She did 3 coats to get as close as we could to the floors. (thanks Boo!)


I then caulked around the sides of the risers to fill the voids there and used some small quarter round molding on the top and bottom to hide the small gaps there. I then applied 3 coats of Polyurethane. 

After all that was dried I taped off and applied 3 coats of white paint.


Turned out pretty good. All and all, took about 4 days to get to the final finish. We both love it and now I don't have to worry about looking at that ugly carpet any more.

Sad note though... Our dog, Mr. Leon, hates it. Watching him go up and down the steps looks like me trying not to fall at the ice rink. Poor old man.


Read Article »

Top 10 Tricks for Turning Your Junk Into Money

If you're looking to declutter a little bit, there's no better way to do so than selling your junk online. Here are our top 10 tips and tricks for getting the most money possible out of your old, unwanted stuff.

Read Article »

Make a Camera Crane Out of a Painter's Pole and Some Gears

When all you've got is a video camera (or DSLR with video capabilities) you'll wind up with some pretty shaky, handheld shots. Camera cranes/jibs can fix that for a price, by allowing you to get smooth shots that look like the camera is floating. While normally costly, you can make this happen on the cheap with a painter's pole and some gears.


Instructables user Mr. Noack took a Wooster Sherlock painter's pole, a tripod, and some gears, to create a camera crane on the cheap. He explains the benefits:
The second Wooster Sherlock camera crane was built on the cheap for sure. Using only one pole cuts down the cost. Instead of having one crane that does it all, I decided to build this model specifically for manual tilt shots. The other great feature of this version is the ability to set up the camera for extreme high angle shots.
If you want to give this project a try, check out the full instructions over at Instructables.

Read Article »

How to Handle the Most Common Roadside Emergencies

Be prepared for breakdowns and roadside car problems like flats, dead batteries, and mechanical trouble with this glovebox guide to emergency maintenance.
This post originally appeared on The Family Handyman. Copyright © 2010 The Family Handyman magazine. All Rights Reserved.
When you're dealing with roadside emergencies, it's always better to have a plan of attack than a panic attack. A few simple preparations, including an inexpensive emergency kit, will get you through most breakdowns and accidents. You're already familiar with the standard kit you hear about every fall, which includes a blanket, candy bars, a candle, and all that other stuff. That kit is a good idea. But there are a few additional itemsyou should stock in every vehicle you own, along with this guide. By the way, seriously consider joining a roadside assistance plan. Even seasoned mechanics aren't too proud to belong to one. One tow or a jump start on a freezing day and the annual fee will pay for itself.

Build This Emergency Kit

  • Your car's owner's manual. If you don't have one, get one from your dealer. It'll show you how to change a tire, explain what all the warning lights mean, list part numbers for lightbulbs, and provide the fluid types and capacities so you can refill with the right stuff.
  • This LED Flameless Flare lasts much longer than an ordinary flaming road flare. Attach the magnetic base to your vehicle and set it to flashing mode to warn other drivers.
  • Spiral notebook and mechanical pencil (writes in any position or weather and needs no sharpening). Use to record accident information, police report numbers, phone numbers, etc.
  • A cheap prepaid cell phone and a car charger. Even if you already own a cell phone, get one to keep in your glove box. Inexpensive phones and chargers are available at discount stores or online and can be reloaded with minutes from the side of the road.

What Warning Lights Mean

Oil light on. The engine has low oil pressure. Check the oil level and add oil if you have some with you. Otherwise, have the vehicle towed to a repair shop. Driving a vehicle with low oil pressure can cause catastrophic engine damage.
Brake light on. Check the operation of the brake pedal. If it feels spongy or goes to the floor, stop driving and have the vehicle towed to a service facility. If the pedal feels firm and the brakes stop the vehicle, check the brake fluid level in the reservoir. If it's low, add more brake fluid. If the light stays on after you've added fluid but the pedal is still firm, have the vehicle serviced as soon as possible.
Airbag/SRS light on. The airbags have shut down and will not work if you get into an accident. Get the vehicle serviced soon.
Traction control/stability control light on. There's a problem with the system. You can still drive the vehicle, but exercise extra caution on slippery roads and in turns. Have the system serviced soon.
"Check engine" light on. If the engine's running smoothly and the transmission is shifting properly, you can continue to drive the vehicle until you can get it checked by a mechanic. If it's flashing, pull over at the nearest safe spot. Have the vehicle towed to a repair shop immediately. Driving with a flashing "check engine" light can destroy expensive ($1,200 and up) emissions components.
Charging system light on. There's a major failure with the charging system. Drive immediately to the nearest repair shop.
ABS light on. There's a fault in the anti-lock brake system. You can drive the vehicle and operate the brakes. But exercise more caution on slippery roads. Get the problem checked out soon.
High temperature. Pull over at the nearest safe spot and turn off the engine. DO NOT open the radiator or the coolant reservoir. Have the vehicle immediately towed to a repair shop. Driving an overheated vehicle can cause serious engine damage costing thousands of dollars to repair.

How to Jump-Start a Dead Battery

  1. Turn off the ignition and all electrical accessories in both vehicles.
  2. Connect the positive jumper clamp (marked "+" or colored red) to the remote terminals on the good vehicle. They're located away from the battery. If you cannot find the remote terminals, connect the positive ("+") jumper clamp to the positive ("+") battery terminals. Then do the same on the dead vehicle.
  3. Connect the negative jumper clamp (marked "–" or colored black) to the remote negative terminal on the dead vehicle. Then connect the clamp to the good vehicle. If the vehicles don't have remote terminals, connect the negative jumper clamp to an unpainted metal surface at least 18 in. away from the battery.
  4. Start the good vehicle and let it charge up the dead battery for at least five minutes. Then try to start the dead vehicle with the cables still in place. If it doesn't start, call for service.
Warning! Connecting the jumper cables in the wrong order or attaching the spring clamps in the wrong location can damage expensive electrical components and even cause an explosion. Your owner's manual leads you through the procedure step by step. Follow it to the letter! If you don't understand the procedure, call a tow truck. Automotive batteries can vent explosive hydrogen gas when they are discharged. Do not smoke when jump-starting, and don't use jumper cables with cracked or missing insulation.

How to Get Unstuck

Place the gearshift in "1" or "low." Press the accelerator and allow the spinning wheels to move the vehicle forward a bit (do not exceed 15 mph on the speedometer). Then release the gas and let the vehicle roll backward. Immediately apply the gas to roll forward again. Continue this procedure to build enough momentum to rock your vehicle out of the rut.
Do NOT shift the transmission back and forth between "D" and "R." That can destroy your transmission and result in a repair bill of at least $1,500. If you cannot rock the vehicle out using the procedure above, call a towing service—it's cheaper than a new transmission.

How to Change a Flat Tire

Changing a tire is fairly straightforward. You'll find all the instructions on a decal near the jack and in the owner's manual. But in some situations, you should not change your own tire.
If you have a flat tire on a highway or narrow residential street and the flat tire is on the driver's side of the vehicle, call for roadside assistance. Even if you pull off onto a paved shoulder, the risk of being struck by another vehicle is extremely high—especially at night.
If the highway has a narrow or unpaved shoulder and there's a nearby exit, you can drive the vehicle to the exit and call for help once you're off the main road. Turn on your hazard flashers and drive slowly. Be warned that you will most likely destroy the tire and possibly the wheel by driving to the exit. But that's smarter than changing a flat tire on a busy shoulder.

What to Do If You're in an Accident

  1. Check for injuries. If anyone is injured, call 911 immediately. Do not move injured occupants unless you see fire, suspect the risk of fire, or are instructed to do so by 911 operators.
  2. Find out your location. Note the street address, highway mile marker, destination sign or nearest billboard. Emergency personnel and your insurance company need this information.
  3. Note the weather conditions, skid marks and the damage to the other vehicle. Sketch the accident scene.
  4. Locate any witnesses and get their account of the accident and their name, address and phone numbers.
  5. Don't admit to any fault.
  6. Get a copy of the police report or find out how to obtain a copy.
  7. Don't make any "deals" to pay out-of-pocket in order to avoid notifying your insurance company. Your policy requires you to report the accident even if you choose not to file a claim.
  8. Contact a towing service to move your vehicle to a repair shop, and make arrangements to get home.
  9. Call your insurance company to report the accident and file a claim.
Roadside Emergency Guide | The Family Handyman
The Family Handyman is the DIYers best friend, offering a variety of print and digital resources for do-it-yourself homeowners. Their forte is accurate and complete how-to instructions for improving homes, yards, and vehicles. They publish The Family Handyman magazine, the oldest and largest publication for DIYers, and a variety of newsstand publications in addition to this web site. The Family Handyman is part of the Reader's Digest Association family of brands, including Taste of Home, Birds & Blooms, and of course Reader's Digest.
Want to see your work on Lifehacker? Email Tessa.
Read Article »

Follow My Inspiration On Pinterest

JonnyChapps Stats