Showing posts with label diy. Show all posts

Our Kitchen Remodel (a story in pictures)

kitchen remodel before after

Hello everyone. So, we have finished our Kitchen remodel and I wanted to share the transformation with you. We've actually been finished for a few weeks now (sans the cabinet and drawer pulls) but I have finally gotten around to posting these pictures.

This post isn't really a how-to, but more of a progress collage of pictures. Hopefully it will give you some inspiration. If you have any questions of what we did or how we did it please ask.

We purchased our house a little under a year ago and knew that remodeling this kitchen was going to be the first big project we would tackle. Here she is in all her pre-remodel glory...

Read Article »

Getting Started with Gardening Using Raised Beds


by Kristian Hansen, Garden Expert at the Urban Garden Workshop
Starting your very first garden can be a daunting task. This is a guide to help make your entry into gardening fun and easy, and to give you some guidelines to help foster your relationship with your backyard. By the end of this article, you should be able to answer the following questions:

• Where do I begin?
• What kind of plants should I grow?
• How should I build, construct, and prepare my garden?

Now, let’s get started!

Planning Your Garden: Site Selection & Size

The first step to a successful garden is figuring out where you are going to place it. The space that you choose will help determine the types of plants that will grow best. Spend a day figuring out where in your backyard you get maximum sunlight. Your vegetables require 6-8 hours of natural sun per day to mature quickly.

You will might also want to determine the pH level of your soil. What kind of dirt do you have available? You might have to add nutrients to the soil, compost, etc. to make it great for growing your plants.

If you’re just starting out with gardening it might be easiest to build a raised bed. These come in a variety of sizes to fit inside of your backyard. Best of all, you can always add more later or take them apart and relocate them somewhere else later on. I also like first-time gardeners to try out raised beds because you can control most of the variables, like the soil content and watering schedule best. Since California is in a draught, we need to be mindful for water and how we can use it best.


Raised Beds: Save Water & Easy to Build

A raised bed is a great way to get started once you’ve decided on the location of your garden.

Redwood or Cedar makes for great wood. Make sure it is not treated lumber (I do not recommend pressure-treated wood due to the chemicals that can leach into your food). I recommend using 2" x 6" lumber. You can cut it down to the appropriate heights and use 4" x 4" wood in the corners and secure it with carriage bolts.

Furthermore, you can make the raised bed multi-tiered to raise the overall height of your garden (12" or two tiers is great for carrots).

If you have issues with rodents (like gophers), you may want to use hardware cloth underneath your raised bed.

Irrigation & Water

If you’re growing vegetables, you’ll want to provide about an inch of water per week. I tend to water my plants in the morning or at night.

Depending on how warm your area is you may only need to water your plants once a day or every other day. You can purchase a water timer from most nurseries for $20-50 and a simple irrigation kit of drips and tubing for another $30-50.

Vegetables & Fruits

The types of vegetables and fruits that you grow depends on the amount of sunlight and temperature you can provide for your plants. You can buy seeds online or find them at your local nursery. When I shop for seeds, I try and buy heirloom non-GMO varieties.

If you’re a little late in planning your garden, it might be time to buy starter plants. You can buy plants that are a few inches tall already and will jump-start your garden by about a month.

Depending on how big you decided to make your garden, you should set aside some space for the following:

Herbs & Spices: Thyme, Rosemary, Dill, Lavender, Basil, Mint;
Vegetables: Cucumbers, Tomatoes, Kale, Lettuce, Spinach, Potatoes; and
Fruits: Strawberries, Grapes, Blueberries.

Summary

Starting your garden should be fun for your whole family. With a few hours of work you can start to see results. Within a week of planting your seeds, you’ll see sprouts and your garden becoming a reality.

As you take care and nurture your plants, you’ll see your plants grow, leaves spread and fruit and vegetables bloom, and you’ll be happy growing your own food and making your backyard a more beautiful, living and useful space.

Read Article »

Extremely Heavy Duty Work Bench

I saw this great idea for a work bench online and wanted to share with you guys. It is very thorough and informative. 


Intro:

I have an area in the old barn that is unused and I wanted to convert to a 'rough' working place. The floor is unlevelled , which require adjustable feet to adjust for the height difference up to 30 mm. The angle of the wall corners are not perpendicular, they are more like 86 to 93 degrees, which require a remissive design.

Read Article »

Elevated Dog Bowl from Crate

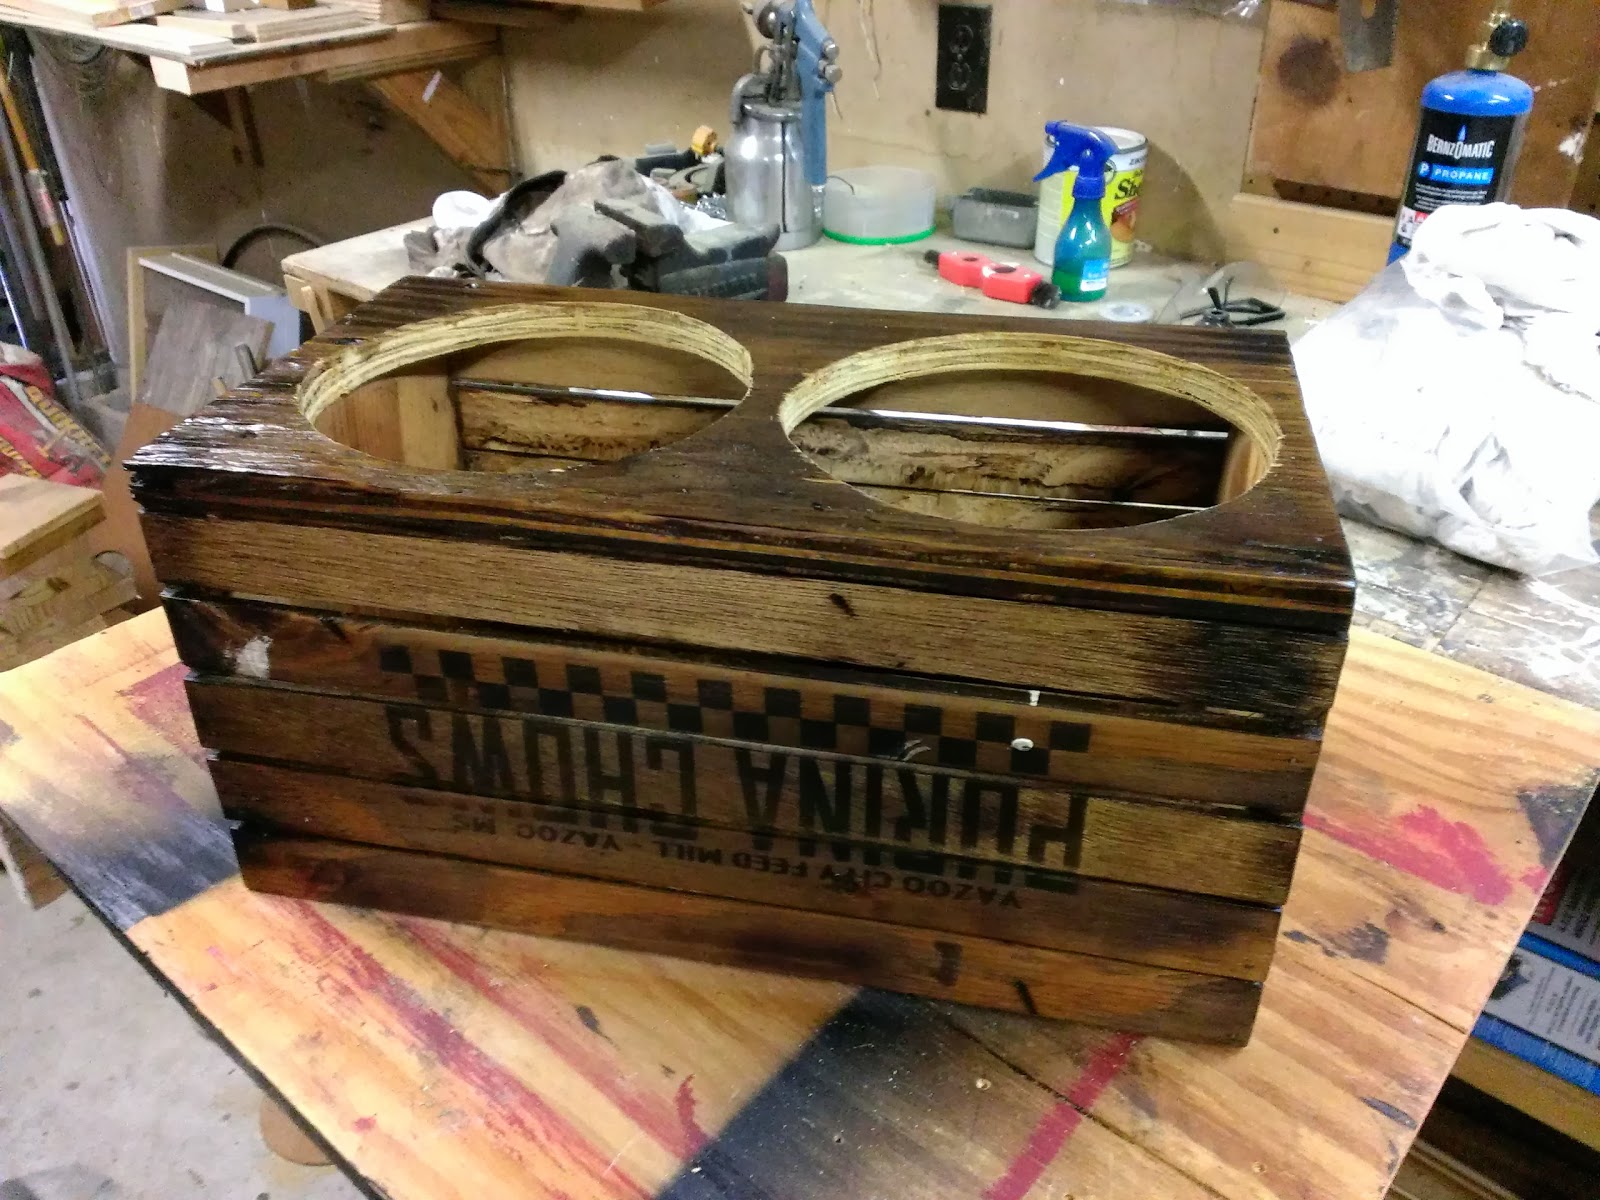
Spent a lazy Sunday in the shop today and threw together a project to make our dog's life a little easier. When larger dogs age I've heard that it's harder on them to bend down to get food and water out of their bowls on the floor. Is it true? Who knows, but I figured I'd at least give him a little assistance and allow me to stay busy in the shop, so here it is, an elevated dog bowl.

elevated dog bowl

I began by building a crate out of spare wood that was laying around. View the video below on building your own crate. I pretty much followed those same steps and altered a little for my needs like adding a stencil on the side to give it that old crate look and adding hand holes on the sides.


I purchased two plastic bowls from the dollar store and cut holes in the base to hold them. I hope you like it, the dog sure does.


Mr. Leon approves!
Read Article »

This Graphic Shows You Quick Home Improvement Projects You Can Tackle


Sure, some home repairs increase your value and others don't, but we're all busy people, and not all of us have time for a massive kitchen remodel. This infographic will walk you through some of the ways to improve your home—and its value—in your spare time.

Most of the improvements are easy enough for anyone can do, even if you don't consider yourself much of a DIY-er. For example, the graphic suggests picking up an auto-mower if you have the right kind of yard for one, or adding a few window boxes with some flowers or herbs in them to brighten up the facade of your home. They also suggest adding dimmer switches to major rooms where a little soft light can improve the mood.

The guide also has some more questionable suggestions (mirrors "create energy?" and desks shouldn't face walls?) so take them with a grain of salt and apply the ones that make sense for your space and style. Even some of the questionable ones (mirrors can make a small space feel larger and brighten it up) can have some practical application. Check out the full image below, or hit the link below to see the graphic at QuickQuid.


Read Article »

Survive the Apocalypse with These Common Kitchen Items


When the lights go out or there's a natural disaster and you need to fend for yourself, proper preparation is key. Even better is knowing how to make use of the common items you may find in your home, or wherever you go. Channel your inner Macgyver and pick up a few tips from this graphic.

This guide shows you how to make a few things we've discussed before, most notably the Crisco candle and the milk jug lamp. However, the guide also has instructions on how to make a quick stove using common fertilizer, a simple water purifier, and even a toilet paper/coffee can heater in case of emergency. Hit the link below to see it at its source, or click expand on the image below to get a better view.

Do It Yourself Disaster Survival | Equip Supply via MakeUseOf

Read Article »

Dowel Hole Drilling Jig

This is jig to make holes for dowel without measuring. More precise you make this jig it will work better, so take your time. you can make it from laminated parts also and laser cut it for best results.

Step 1: Main parts

This are main parts. I used two 40mm X 250mm pieces of scrap.

Step 2: Making Slide

For slide I used scrap 4mm plywood.

Step 3: Using your jig

  1. Pinch side of material with jig.
  2. Drill hole
  3. Put dowel in hole.
  4. Turn Jig upside down and put other side of dowel in drilling hole on your jig.
  5. Set slide to touch edge of material.
  6. Align tables and leave space for jig.
  7. Put jig channel over dowel.
  8. Push tool so slide will align to material edge.
  9. Drill your hole.
  10. Repeat for all holes.
Tips
You can drill all holes on one side at one time, makes it easier and quicker.
Use depth gage so you will not drill through material.
This is how to use Woodcraft DowelMaster, idea is similar

Step 4: Variation

This I made for friend and it is with 6mm, 8mm, 10mm holes.
Read Article »

Take the carpet off those stairs!

Hey guys. Wanted to share my latest project with you. There are countless articles and how-to's on the web of folks who have taken the carpet off of their stair cases to reveal hardwood. This is what I went through to do mine.


Out staircase was covered in that ugly beige carpet, and over time had gotten soiled and stained from all the traffic up and down. I decided it was high time to do something about it.


Nasty right? The first step... remove the carpet. Now, others who have done this were blessed with almost perfect wood stairs underneath.  A little sanding and painting and they're done. Was I going to be so lucky?


No. There were huge gaps between the steps and risers and between the stair case and walls. I didn't want to surround the whole thing in molding to cover all the gaps so I needed to replace all of the wood. I replaced the steps with 2"x12' lumber and the risers with 2"x8' lumber. It worked out to about $75 at the hardware store. And I didn't have to worry with removing all the nails and staples that held down the carpet. Lucky me!

Some install and light sanding was all she needed.


Now came the fun part, staining. We used Dark Walnut to try and match our floors. My wife was nice enough to tackle this project while I was at work. She did 3 coats to get as close as we could to the floors. (thanks Boo!)


I then caulked around the sides of the risers to fill the voids there and used some small quarter round molding on the top and bottom to hide the small gaps there. I then applied 3 coats of Polyurethane. 

After all that was dried I taped off and applied 3 coats of white paint.


Turned out pretty good. All and all, took about 4 days to get to the final finish. We both love it and now I don't have to worry about looking at that ugly carpet any more.

Sad note though... Our dog, Mr. Leon, hates it. Watching him go up and down the steps looks like me trying not to fall at the ice rink. Poor old man.


Read Article »

Top 10 Tricks for Turning Your Junk Into Money

If you're looking to declutter a little bit, there's no better way to do so than selling your junk online. Here are our top 10 tips and tricks for getting the most money possible out of your old, unwanted stuff.

Read Article »

Make a Camera Crane Out of a Painter's Pole and Some Gears

When all you've got is a video camera (or DSLR with video capabilities) you'll wind up with some pretty shaky, handheld shots. Camera cranes/jibs can fix that for a price, by allowing you to get smooth shots that look like the camera is floating. While normally costly, you can make this happen on the cheap with a painter's pole and some gears.


Instructables user Mr. Noack took a Wooster Sherlock painter's pole, a tripod, and some gears, to create a camera crane on the cheap. He explains the benefits:
The second Wooster Sherlock camera crane was built on the cheap for sure. Using only one pole cuts down the cost. Instead of having one crane that does it all, I decided to build this model specifically for manual tilt shots. The other great feature of this version is the ability to set up the camera for extreme high angle shots.
If you want to give this project a try, check out the full instructions over at Instructables.

Read Article »

Vintage Style Train Bulletin Build

I was kicking around the shop the last few days over Christmas holiday and wanted a quick project to work on that wouldn't take away form the presents and food!

I have always sorta been a train buff and saw a picture of a train bulletin that peaked my curiosity. They're from the age of train travel and were posted in the stations to alert passengers of the train times and schedule, sorta like what's in airports now. So, with some spare wood and paint, this is what I came up with.

Vintage Style Train Bulletin Build

I cut a spare piece of wood from an 1/8" 4x8 sheet of plywood at 2' x 4'. (I am limited to this size because that is as large as the Sizzix machine will cut.) I also cut and routed the frame out of spare 1x2's. I then spray painted the 2x4 with chalk board paint and then stained and sealed the frame.


I designed the plans in Photoshop and then cut it out using the Sizzix eClips to form the template for painting.


I then transferred this to the sheet of wood which I had painted in chalk board paint and sprayed it white.


After the paint dried I removed the stencil and mounted the frame. Quick and easy! What do you think?


Read Article »

Clamping Squares

If I was a superhero, my weakness would be glueups. Thankfully, those aren't really needed in the crime fighting business ... yet.
Maybe I don't plan ahead. Maybe I'm too impatient and just desire instant gratification. Maybe I'm just not that good at woodworking. I'm not sure, but tons of people are really bad at driving and they just keep doing it.
I'm making some games for Holiday gifts and they all have mitered sides. I have a shop made clamping jig for picture frames, but it isn't good for taller sides like these. I tried a band clamp, but there was some sliding. I moved up to some pin nails, but there was still some racking. I want this thing as square as possible (I know it won't be 100% square because life taunts me).
To the scrap bin!!

Step 1: The Material

I have a bucket of corner cut offs ... left over from a project which required discs. The dics were cut from plywood squares, so these corners are already square. I also checked them to make sure.

Step 2: The Layout

I need holes large enough for my clamps and far away from each other to give room for afore mentioned clamps. For me, this was 3" from each squared corner and then 1 1/8" in from the edge to intersect that mark.

Step 3: The Hole Drilling

I made my holes 1 1/2" with a forstner bit.

Step 4: The Clamping

Put your square in the corner and add your clamps. The only thing left is to smack yourself in the head for not making a stack of these years ago (my head still hurts).

Step 5: Update: Cleanup and Modification

Using a temporary stop block on my miter saw, I trimmed the square side lengths to be even and then trimmed the front straight. All cosmetic.
Lastly, as suggested by a member of the community (good call dimtick), I nipped off the back corner to allow for any glue squeeze out, which would otherwise make these blocks part of your project. Non-Super Hero Teamwork!
Read Article »

Wooden 6 Pack Holder

Do you ever see those cool wooden 6 pack holders on Etsy that are ridiculously expensive? Well, with this Instructable, you can make your own for a fraction of the price!

Step 1: Materials

Materials- 36" x 5.5" x 0.5" pine board
- 36" x 3.5" x 0.5" pine board
- 12" x 0.5" oak dowel or metal pipe
- 5 mm thick plywood or board
- nails
- glue
- (optional) ~30 ft twine
- (optional) Wood stain
Tools
- Miter saw
- Clamps
- Drill with 0.5" drill bit
- Hammer
- Hand saw
- (optional) Pyrography tool

Step 2: First Cuts

So you should have 3 boards (picture 2)
On the 36" x 3.5" x 0.5" board
- Cut 2 times at 22.67 cm (picture 3, ignore the writing on the boards) (Boards 3A and 3B)

Step 3: Cutting the Spacers

Using the 5 mm thick plywood/board
- Cut 2 long pieces (7.5 cm x 13.7 cm) (picture 1)
- Cut 3 short pieces (7.5 cm x 6.2 cm) (picture 2)

Step 4: Angle Cuts

On the miter saw, adjust the angle to 25 degrees. You can choose your own angle if you want, but i have found that 25 degrees just looks nice and is pretty easy. (picture 1)
On Boards 1A and 1B (13.8 cm x 27.75 cm x 1.27 cm)
- Mark on the top 3.8 cm inwards (picture 2)
- Using the miter saw, cut the boards at 25 degrees (picture 3)

Step 5: Holes for the Handle

Now that Boards 1A and 1B have their 25 degree cuts, we need to cut holes for the handle.
- Find the center of the board vertically (up and down)
------>You can do this by taking the measure of the length of 1A and 1B (13.8 cm) and dividing it in half. You should get 6.9 cm and mark this on the board at the bottom and around the middle. Connect these 2 marks with a straight edge, going all the way up and down. Now you can see the center of the boards (picture 1)
- At the top of the boards (the sides with the angle cuts), measure 2 cm down from the top and make a mark. This is where we will drill the hole.
- Using a 1/2 inch drill bit, make the hole exactly on the dot you just made (picture 2)

Step 6: Cutting the Handle

I forgot to take pictures at this part, but it is very straight forward.
You can use either a metal pipe (as I did) or a hardwood dowel for your handle. Avoid softer woods like pine because it may not be strong enough to support 6 full, glass beer bottles.
- Cut the 1/2 inch dowel/pipe at 22.67 cm.

Step 7: Sanding and Optional Decoration

Now that everything has been cut, you need to sand down the wood, patch any knots, etc. From this point, you can customize your 6 pack holder in a few ways:
- Stain the wood (picture 2)
- Add pyrography (pictures 3 and 4)
--------> If you want to learn how to do pyrography, check out my otherInstructable.

Step 8: Gluing the Bottle Spacers

On Board 2, you will need to make lines so that you can accurately glue down your bottle spacers.
- (step A) Using the trick from step 5, make a line bisecting Board 2 horizontally (6.9 cm)
- (step B) For the second set of lines, you can use the same principal, but instead of dividing by 2, you have to divide by 3. This means that you will have lines every 6.72 cm.
- Using these lines as guides, begin gluing the 2 long spacers (7.5 cm x 13.8 cm). I found that using an angle clamp helps a lot. (picture 2)
- When those are dry, begin gluing the 3 small spacers (7.5 cm x 6.2 cm). (pictures 3 and 4)
Make sure that the spacers do not extend beyond Board 2. Sand them down if you need to.

Step 9: Hammering it all Together

Now is the time to put everything together and see your hard work pay off. You can glue everything together, but nails are much faster. This may be a bit confusing, but just refer to the pictures.
- Take Board 3A and clamp it to Board 1A (picture 1). Nail the two Boards together (picture 2).
- Repeat this with Board 3B on the other side of 1A.
- Now that Boards 3A and 3B are nailed to 1A, clamp 1B onto the opposite end (picture 3)
- With all the 1 and 3 boards nailed together, you should have something that looks like picture 4.
- Slide in Board 2 (with the bottle spacers). If it does not fit, you may need to sand a bit off the side. (picture 5)
- Nail Board 2 on all four sides (picture 6)

Step 10: Handle

- Take the handle you cut in step 6 and push it through the two holes on Boards 1A and 1B. If it does not fit, you may need to sand the ends of the the handle or widen the holes.
- (Optional) You can wrap the handle with twine. You will need around 30 feet of thin twine (or less if you use thicker twine). Start by tying a clove hitch on one end. Continue to tightly wrap the twine around the dowel/pipe until you reach the end. Finish it off with another clove hitch.

Step 11: Fill it up and Enjoy!

Congratulations! You have now made a wooden 6 pack crate.
Thank you for reading my Instructable.
Read Article »

Follow My Inspiration On Pinterest

JonnyChapps Stats